Thursday 17 October 2013

Oracle DBMS_REPUTIL

Oracle 11.2.0.4 and DBMS_REPUTIL


Had to implement a workaround for something a bit odd today. For some reason Oracle 11.2.0.4 does not grant public access to the DBMS_REPUTIL package. This meant all the triggers in my application stopped working!

Replication

The DBMS_REPUTIL package is the database interface to functions used to make replication work. Lots of the insert triggers in this application I work on (during my day job) use the DBMS_REPUTIL.from_remote to determine if the insertion was as a result of a replication from another DB. If so then the trigger does nothing as the record that would have been created by the trigger will also be replicated. So often you will see this:

IF dbms_reputil.from_remote = true THEN
    return;
END IF;

The problem is that in 11.2.0.4 and not in 11.2.0.1 or prior) this package is no longer publicly executable. I think perhaps if you call the replication_on function it might fix itself up but in our case the triggers are setup for replication but it is up to our customer if they choose to enable replication or not.

What we saw was that when an insert occured, an error would be returned like this:
ORA-04098: trigger "schema.trigger" is invalid and failed re-validation 

You can see what the problem is by doing:
show error trigger <triggername>

LINE/COL ERROR
--------------  -----------------------------------------------
1/7             PL/SQL: Statement ignored
1/10            PLS-00201: identifier 'DBMS_REPUTIL' must be declared 

Granting Access

The configuration application which creates the DB schema will also create database users that own the schema. The configuration application connects to the database as system or at least as some privileged DB account. The obvious thing is to have the application grant execute rights to the DB users created but even that wasn't possible as even the system account did not have rights over the package and therefore could not grant them to other users.

The obvious thing to do is
grant execute on DBMS_REPUTIL to system;

Then modify the configuration utility to do the same for accounts it creates. This isn't quite enough though as the system user also has to have the right to grant this right to other users so you have to say:
grant execute on DBMS_REPUTIL to system with grant option;

All our application users have a common role so initially I granted the role access to this package but I found this wasn't sufficient. I'm not really sure why but I found granting the actual user execute rights did work.

When testing this out I found the trigger would still fail after granting access. In fact the show error trigger XXX still showed the same fault. It turned out you have to re-validate the trigger (recompile it) and you can do this as follows:
alter trigger <triggername> compile;

Then it should work.

Detecting the Condition

The thing is that the configuration application would succeed in creating the schema and it wasn't until later when we tried to run the system that it would fail. We wanted this condition to be evident before the user even ran the tool to create the application schema so we needed a way to detect it in the tool.

There is a table called  ALL_TAB_PRIVS that you can query to determine what users have what rights on a package or table. So it then just became a matter of saying:
select count(*) from ALL_TAB_PRIVS where lower(table_name)='dbms_reputil' and privilege='EXECUTE' and lower(grantee)='public' or lower(grantee)='username';

If this returns a value greater than 1 it means either public access is available or 'username' has access to the table. If it is zero then the tool flags an error to the user running the tool to tell them to fix it.

Wednesday 9 October 2013

Java Certificate Path Validation Weirdness

I had to create some code that would validate a PKCS#7 signedData structure using a set of pre-configured trust points. We also need to verify the signer certificate has not been revoked and we wanted to support both OCSP based revocation checking (based on embedded AIA extension) and CRL Distribution Points for retrieving CRLs from HTTP locations.

I wrote some code in Java to do this based on sample code on the Web. Essentially I used a Certficate Path Builder which would both locate a path based on a bucket of certificates and set of trust anchors (trusted certificates) and validate the path (including checking the revocation status).

            Set<TrustAnchor> trustAnchors = buildAnchors();

            X509CertSelector selector = new X509CertSelector();
            selector.setCertificate(certificate);
            
            PKIXBuilderParameters params = new                                   PKIXBuilderParameters(
                   trustAnchors, selector ); 

            params.addCertStore(
                makeAdditionlCertStore(
                     certificate,additionalCerts));

            params.setDate(messageSigningDate);

            //
            //  Enable OCSP lookup
            //
            Security.setProperty("ocsp.enable","true");
            
            //
            //  Enable Certificate Revocation List Distribution 
            //  Points (CRLDP) support
            //
            System.setProperty(
                 "com.sun.security.enableCRLDP","true");
            
            CertPathBuilder builder = 
                CertPathBuilder.getInstance("PKIX");
        
            return builder.build(params);

This seemed to be working fine. I tested this with a SSL path issued by a public CA and it was able to get the revocation status and all was well. I disabled OCSP and it still fetched the revocation status using a CRLDP extension in the certificate.

What I didn't initially check was that if I disabled CRLDP it failed even though the path I was testing had an AIA extension pointing at an OCSP server which was accessible. I did some Googling on this and found this which seems to indicate OCSP is not supported via the path builder before JDK 1.8!

So then I re-wrote the code to use the certificate path validator and again this didn't work but this time I got a wrong key usage exception. Well according to this there is a bug in 1.7 update 6 through 10 where OCSP fails with this error!

I updated to update 25 and sure enough the problem goes away.

The problem with the path validator is it literally does what the name implies and so unless you have a path already built for you then you either have to use the path builder or do it yourself. With PKCS#7 structures the ordering of the additional certificates is arbitrary (well they are ordered lexicographically on their encoding according to DER as they are sent as part of a SET) so you can't assume they will be in path order.

My solution in the end was to use the path builder to build the path but turn off revocation checking and then once I have a path to validate it with the path validator. This is going to be pretty inefficient but then what choice have I got until I can upgrade to 1.8?

        public void validateCertificate( 
            X509Certificate       certificate,
            List<X509Certificate> additionalCerts )
                    {
            Set<TrustAnchor> trustAnchors = 
                buildAnchors();

            CertPath cp = 
                 makeCertificatePath(
                     trustAnchors,
                     certificate, 
                     additionalCerts,
                     messageSigningDate);
            
            PKIXParameters params = 
                 new PKIXParameters(trustAnchors);

            params.setDate(messageSigningDate);
            params.setRevocationEnabled(true);
            params.setSigProvider("BC");
            
            //
            //  Enable OCSP lookup
            //
            Security.setProperty("ocsp.enable","true");
            
            //
            //  Enable Certificate Revocation List Distribution 
            //  Points (CRLDP) support
            //
            System.setProperty(
                "com.sun.security.enableCRLDP","true");
            
            CertPathValidator cpv = 
                CertPathValidator.getInstance("PKIX");

            return cpv.validate(cp, params);
        }

    private CertPath makeCertificatePath(
            Set<TrustAnchor>        trustAnchors,
            X509Certificate         certificate,
            List<X509Certificate>   additionalCerts, 
            Date                    messageSigningDate) 
                    throws  CertificateException, 
                            InvalidAlgorithmParameterException, 
                            NoSuchAlgorithmException, 
                            CertPathBuilderException
    {
        X509CertSelector selector = new X509CertSelector();
        selector.setCertificate(certificate);
        
        PKIXBuilderParameters params = new 
            PKIXBuilderParameters(trustAnchors, selector );
        params.addCertStore(
            makeAdditionlCertStore(certificate,additionalCerts));

        params.setDate(messageSigningDate);
        params.setRevocationEnabled(false);
        params.setSigProvider("BC");

        //
        //  Throws if path building/validation fails
        //
        CertPathBuilder builder = 
            CertPathBuilder.getInstance("PKIX");
        
        CertPathBuilderResult result = 
           builder.build(params);
        return result.getCertPath();
    }


Thursday 3 October 2013

Repainting a Boat

Sabot Respray


My son sails a sabot which is a small (8 foot) sailboat for kids under 16. The nationals are on in Sydney this year and his old boat was getting too hard to maintain so we decided an upgrade was in order.

We bought an older (2006 we think) Van Munster Sabot which are reputed to be very fast. What makes them fast is a combination of tweaks to the hull design (while staying in the class rules) and the fact that they are constructed out of epoxy/glass composite which makes them quite stiff. I also like that they have no thwart so you can get right up the front in light breeze. Also there is no internal lip on the gunwale so when you right them after a capsize, less water is trapped in the boat.

The early Van Munster boats just had one little problem - they were coated in gelcoat which doesn't stick to epoxy... Apparently some chemical barrier was used to make it work except it didn't (work that is). What happened was that after a year or so the gelcoat started cracking and looked a lot like crazed pottery. As time went on it would start to fall off in big bits and expose the resin underneath. The only solution was to get all the gelcoat off and re-spray the boat which is pretty expensive.


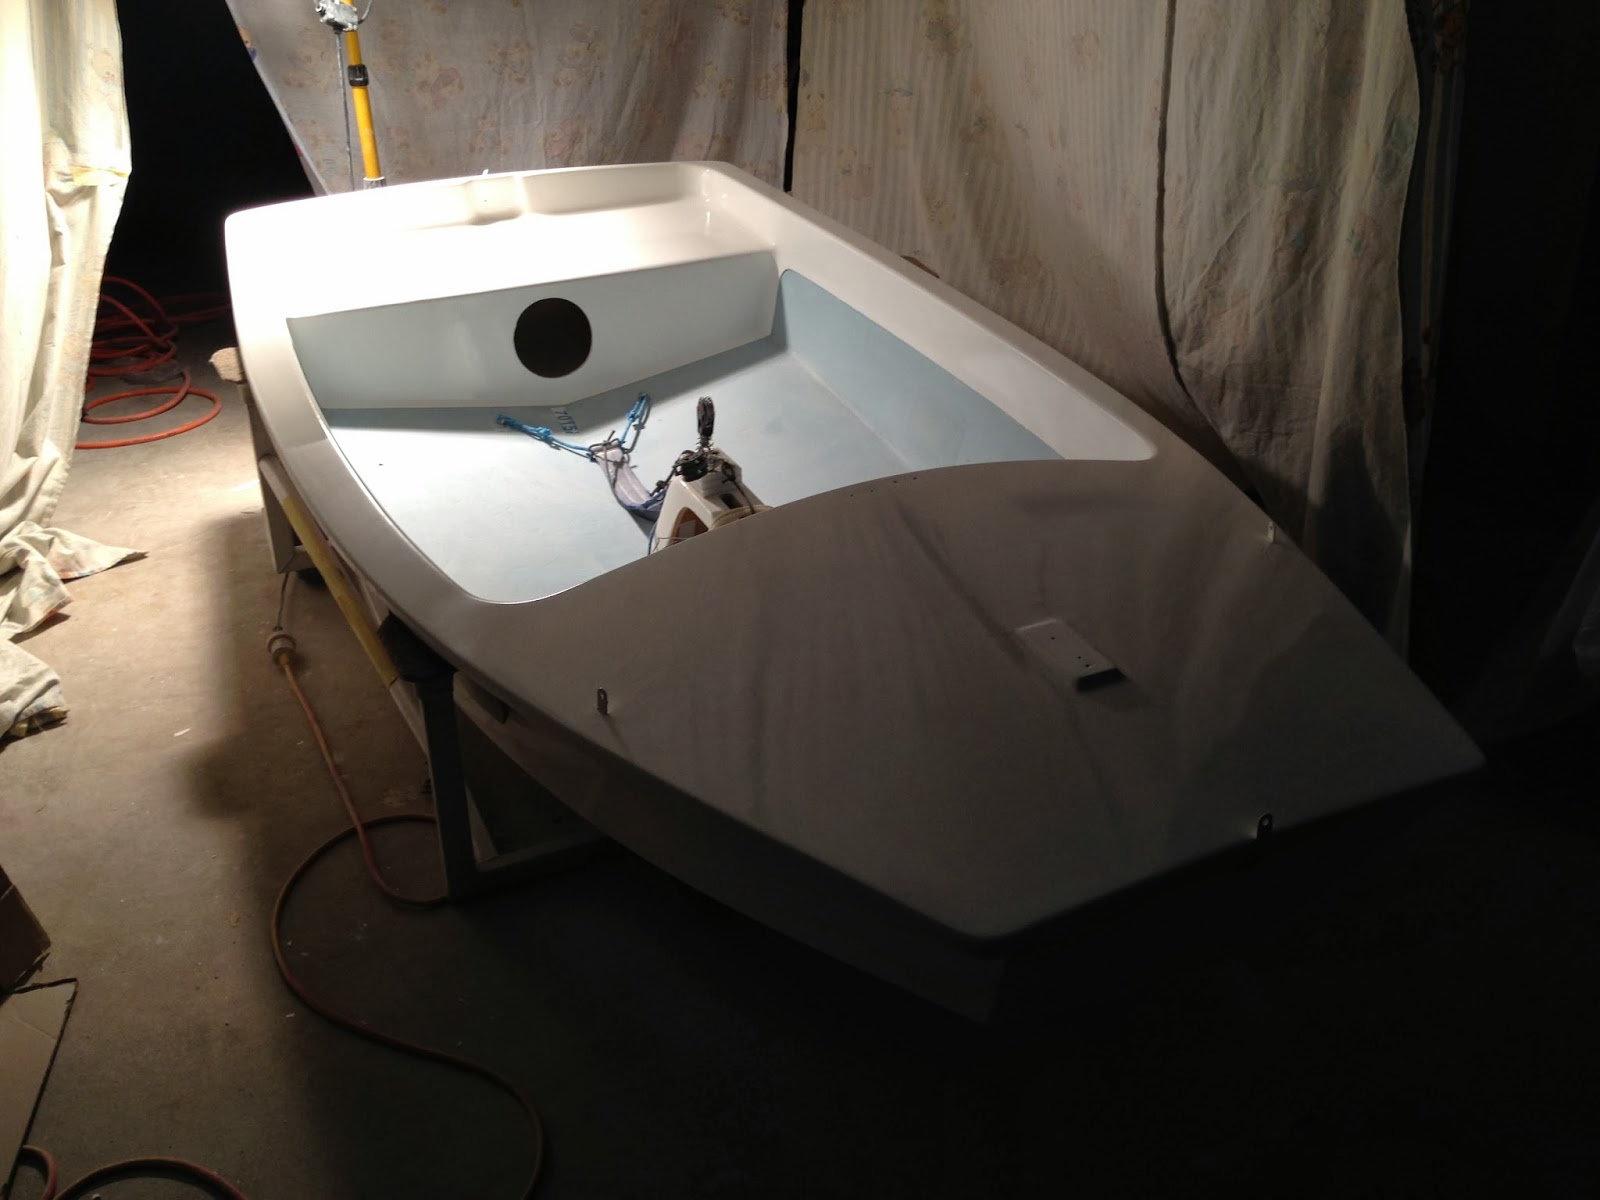
The sabot we got for my son had been partially re-sprayed. The bottom had been done but the deck and buoyancy tanks had not. Consequently it was a bit cheaper than other boats of this type.

Being the masochist that I am I decided to fix it myself. Initially I was just going to remove the gelcoat and have someone else re-spray it. Then I was thinking I could prime it with a roller and let someone else do the topcoat. I looked at compressors, and gear and decided it was too expensive to spray myself.

After lots of research and thought I bought a compressor and did the whole job myself in the garage!

Removing the gelcoat

I talked to a friend and he told me to get a random orbital sander with those round velcro pads so I bought one of these. The dust catcher is nice (and effective) but I had a lot of problems with mine as the screw holding the pad to the motor would come undone. I pulled it apart a couple of times and put the screw in with thread-lock but it still didn't help.

Gelcoat is very hard and it takes *forever* to sand. Also you can't get into the curved parts even with a mouse sander and trying to sand it by hand (even with the toughest 80 grit paper) is impossible. I talked to a boat builder at a sailing training day for my son and he said you can use a chisel to scrap it off safely.

The chisel made it much easier and didn't seem to damage the resin underneath. I did poke the resin in one or too spots but it wasn't hard to repair.

Surface Filling

When the gelcoat came off it became apparent the surface is quite pock-marked from what appeared to be bubbles in the resin between the gelcoat and the glass. The bubbles seem line up with the weave pattern of the glass. Interestingly the areas where the worst delamination occurred seemed to have the most bubbles.


I decided rather than use a high-build primer I would fill the surface with an epoxy filler. My thinking was that a filler made with micro-spheres or similar will be lighter weight than primer. I used Epifill (as I had some) and filled the surface holes and then sanded. This took quite a few goes as there were areas like the back gunwale where the glass seemed to be corrugated as it was wrapped around the mold.

This process took quite some time. I never did quite find a comfortable way to lay the boat so I could work on it without bending right over. For some of it I could sit but not all.


Compressors and Spraying

In between removing gelcoat, bogging and sanding I was also looking at what it would take to spray the thing myself. The quotes for even just spraying the top coat were in the hundreds. 

The advice I was given was that if I am to do it myself I will need a compressor that has 13cfm of free air delivery. This is a big 3 HP compressor that needs to run on a 15A (240v in Australia) socket. It is the biggest compressor you can run short of a 3 phase unit. The cost runs around AUD $1000 just for the compressor. After a lot of ebay and gumtree searching I decided this wasn't an option (not worth it if I am only going to use the unit a couple of times a year).

In the process I learned a lot about compressors such as:
  • Some places advertise in cubic feet per minute (CFM) and others in liters and the conversion is 1 CFM is 28.3 liters/minute
  • Some places advertise the capacity in Free Air Delivery (FAD) and some in displacement. FAD is the litres of air pushed out of the compressor per minute at a given pressure (usually 120psi). Displacement is the air pumping capacity calculated by multiplying the cylinder area by the stroke length and number of strokes per minute. Usually this is about 1/3 higher than the FAD volume depending on the efficiency of the pump.
  • Big compressors are usually V-twin or triple cylinder (like a car). Smaller ones are single cylinder.
  • Better compressors are belt driven and have a cooling fan. Belt drive transfers less vibration from the pump to the motor and means they last longer. Direct drive are cheaper.
  • Alloy pumps are cheaper, quieter, capable of higher pressure but don't last as long. Cast iron is preferable if you have the cash.
  • Compressors use oil but oil is bad for painting. Also moisture from the air is bad for painting (in particular 2 pack). Use an inline moisture filter at the gun to avoid problems. Also some air tools require injection of oil into the line to lubricate the tool. I don't need air tools so I don't want oil injection. 


Part of the reason I was thinking about doing it myself (apart from the cost) was that otherwise I can't repair the boat at home. In the past I could repair my son's boat by fixing the glass and then applying gelcoat and sanding with wet and dry paper but this isn't an option as there will be no gelcoat!

Also I have some foils (centreboard and rudder) that need repairing too so it would be good to be able to do this.

So I kept looking and found this place called VG Auto Paints. They sell spray equipment including compressors. They specialize in DIY car painting and have a load of videos on how to do it. (see here). There are loads of videos that I found useful such as how to setup a spray gun how to clean your spray gun but there are lots more.

The other thing I learned from talking with these guys is that you don't need a massive compressor to do small jobs. In the worst case it just means you have to wait while the compressor catches up occasionally.

The final straw was that the boat builder I spoke to about doing the job was backlogged for a couple of weeks.

The one I bought in the end was a small 2.5HP Ross direct drive unit that puts out 120 liters/minute. It is all the things I said are bad above but as I am not using it professionally I don't care. Cheap is good. Also, while the gun says it needs a higher FAD than the compressor quotes, the gun only uses 50psi while the compressor is quoting FAD at 120psi so the actual delivery is much more at 50psi.

Spray Gear and Paint

The compressor came with a pretty useless suction gun that in fact requires too much air to really run off the compressor. It came with a bunch of bits and pieces for pumping up tyres and for blowing off dust plus a collection of fittings, quick connectors and a hose. The fittings and hose were useful although no matter how much I tighten them on lots of them seem to leak air.

First off I needed a spray gun and bought one of these which are quite cheap but offer both 1.4mm and 2.0mm nozzles so I can do both primer and topcoat with the same gun.

Then the list expanded to the following:
  • Inline pressure regulator. This is so I can adjust the pressure at the gun and get the spray pattern right.
  • Inline moisture filter - also fitted at the gun.
  • Mixing cups. These are neat cups with measurements for 4-1, 3-1 and 2-1 mixing ratios. They also have marks for 10%,20% and 30% thinning which makes mixing the paint really easy. They cost a dollar each however.
  • Filter cones (for filtering lumps from mixed paint)
  • Gun cleaning kit (see video)
  • Blue chemical resistant gloves.
  • Disposable paper overall
  • Chemically resistant squeeze bottles for thinners.
  • Spray mask (Sundstrom spray respirator kit)
  • Buffing compound
  • A power buffer with lambswool pad.
  • Lots of masking tape
  • Cheap plastic drop sheets from Bunnings. These are used to mask the bits of boat I am not painting.
  • Face mask to protect my eyes (although I already had that).
The paint came from BC Coatings. I used EP 100 epoxy primer then UT102 2 pack topcoat (which they colour matched to the hull colour). I bought epoxy thinners and thinners for the topcoat also. Unfortunately the primer and thinners only come in 4L tins so I have a lot left over. Having said that I used much more primer than I expected.


Safety

In short, this stuff is toxic. 2 pack more so than epoxy but the thinners from both will kill you or at least intoxicate you and damage your organs. 2-pack is cured with isocyanates which are particularly evil. This datasheet however from Dulux makes the case that the thinner is far worse for you based on vapor pressure and the relative amounts of each substance. 

As I said I bought a respirator with gas filter, wore overalls, gloves and a mask.

In addition, I did the painting inside the garage to limit the travel of the dust/fumes as well as limit dust exposure to what I was painting.

My wife decided I needed a tent to work in so she made me one out of bed sheets. The idea was to limit where the over-spray goes and contain the fumes as well as limit ingress of dust. Also she wanted it to be quick to setup for future jobs. This didn't work out however - see below.

I found an old empty paint tin and used this for cleaning. The way it works is you hold the thing you are cleaning over the tin and squirt thinners on it from a squeeze bottle. The thinners all go into the tin for later disposal. It's really important this stuff doesn't go in the garden or drains.

Painting

So now all my bog is sanded and the boat is smooth. I am ready to paint. I don my gear, mix my paint, load my gun. I used a bit of cardboard as a test target to adjust the gun and sprayed the boat. This worked out Ok except that once I put white primer on the boat I could then can see all the little imperfections like pin-holes in the bog and sagging bits etc. So I get my 200 grit out again, sand it smooth and bog the bits that look bad.

I ended up thinning the primer to 20% and this produced a reasonable finish with the 2mm nozzle.

Here it is after primer:


Then I sand again, redid the plastic covers and sprayed again. The finish wasn't fantastic (a bit sandy) but it was smooth enough (see below for what went wrong). I sanded again with wet and dry, fixed any drips, re-did the covering and was ready for top-coat.

Top coat went on and looked pretty shiny. For the 2 pack I thinned it to around 25%. I had a few drips and I missed one bit and touched one part of the boat with the hose. I gave it a day to dry, used Wet and dry on the drips and bits touched by the hose, re-sprayed the bit I missed and waited for it to harden.

Other things I learned along the way were that you really need to see a surface reflection in the bit you painted to tell if you have it right. If you don't have enough pressure, or were not close enough you end up with a sandy finish. If you are too close or too slow you will get a run. Really good light is important especially when the air is filled with over-spray dust!

Also, as the gun is running out of paint (or when you are painting something horizontal for too long) it will splatter a bit and again lead to a dusty finish.

Here it is after being sprayed with 2 pack and before being buffed (masking removed)

Buff with electric buffing gadget and buffing compound. The buffing gadget was a bit of a pain - the first one had a broken plug (out of the box). The second one got harder and harder to turn on until it just wouldn't any more (after maybe an hour of operation).

I found a few sandy bits and some orange-peel bits. I think the problem was I touched up a few spots but didn't spray it all. The bits I didn't spray got hit with over-spray that made them sandy. Wet and dry sorted it out mostly but took a lot of the shine off. Buffing these bits brought much of the shine back but it still wasn't as nice as the bits that I didn't have to wet-and-dry.

I replaced all the fittings. I bought some silicon that also acts as a sort of glue. I used this around the tank ports (to stick the rings back on) and filled all the holes used for screwing on fittings before I put the screws back in. I also bought big stainless washers for anything that went through the hull and effectively glued the washer on with silicon (on the inside of the hull) before bolting the fitting back on with a nyloc nut. Still need to put the sailing flags sticker back on and some velcro for the bailer.

Here it is with the name applied and all the fittings back on.


Stuff that went wrong

The worst part of this job is that we started late so the boat ended up a couple of weeks late for the sailing season. This created pressure which meant mistakes and also the errors seemed bigger because of their impact on the schedule.

  • As I went along with the removal of the gelcoat my chisel got more and more blunt. By the end it was lifting little bits of resin off with the gelcoat. When I switched to a sharper chisel the problem went away. Nothing you can't fix with bog.
  • Need to be very careful with the proportions when mixing epoxy bog. I used disposable spoons initially but it was hard to measure this way. In the end I used disposable knives and squished two separate blobs of filler onto a platter (cut out of juice bottle) and one separate blob of hardener. Then I mixed the three blobs together. This allows you to see that the three blobs are the same size and therefore the proportions are right. One lot of bog didn't go off and wasted half a weekend while I tried hair-drying it (to get it to harden) and then had to scrape it off.
  • The spray tent was too small. This meant it was hard doing the edges of the gunwales and a couple of times I marked the paint with the hose. Spraying the inside part of the gunwale was tricky as you have to reach across the boat to do it and not touch anything with the hose. Furthermore it took both me and my daughter to put it up as it was heavy. Not sure I'll use it again and I think simply hanging disposable plastic sheeting is better and easier.
  • Lighting is critical - when you start painting your goggles get pasted and the air fills with over-spray. I was using a 500w Bunnings work light because the tent blotted out the lighting in the shed. Twice I nearly knocked it over and more than twice I screwed up the painting because I didn't see a drip developing due to the poor light I had.
  • Adjust you gear well. You need to be able to lift the goggles to look at what you pained and get them back on. You don't want to be adjusting your mask/goggles while painting (with paint covered gloves).
  • Adjusting the gun was easy enough but the first time I cleaned the gun I missed the part about cleaning the breather on the paint reservoir (this wasn't clear on the video). The next time I painted the surface ended up very sandy as there wasn't enough paint flow to get a wet finish. Then when I started using 2 pack I thought I was in trouble with the compressor (thought it didn't deliver enough air) until I realized it changed when I opened the paint cup. Once I sorted this out the painting went smoothly.
  • Need good quality chemical resistant gloves. The ones I used were poor and failed while cleaning so the solvent ended up going on my hands. The solvent stings quite a lot. Worse still I spilled some on the cardboard I was using to protect the bench and then leaned on the bench while cleaning. It soaked right through the disposable overalls and my shorts and stung me... um... where it hurts... If you minimize the amount of solvent that gets on your gloves you can get them to last longer. So clean the air cap and fluid tip last as they are small and cause you to pour solvent over your fingers.
  • I was sanding a bit late (probably 9pm) one weekend and the old bat over the way must have complained to the council. Got a curt letter in the post the following week about noise.  Bit rich considering I hear her calling out 'Oscar wee-wee' to her dog at 2am on a regular basis. Grrrr.

Bog Sayings

Essentially take sayings involving God but replace with Bog. I'm sure you'll find it it funny when your back hurts from sanding the stuff for a few hours.
  • In Bog we trust
  • Blessed be Bog forever.
  • May Bog be with you.
  • Bog save us.

Monday 17 June 2013

MVC Basics

Ok a while back I wrote about this application for managing sailing results and how I was trying to rewrite my previous Java GUI mess so it had greater separation between presentation and logic.

You would think the whole MVC thing is a snack for any modern software developer. For example I see MVC on a daily basis as part of Spring based MVC  web applications etc so fixing my Java GUI mess is easy right? Well not as easy as I would like and forced me to re-examine what I think MVC is or isn't in the first place.

As I stated in my previous post - the objectives are to:

  • Make the bulk of the program logic automatically testable. 
  • Not require the use of a GUI test tool to test the program logic. To do this I  basically want to encapsulate the GUI as closely as possible (i.e minimize the logic inside the bits I can't test - sometimes this is referred to as a Humble Object http://martinfowler.com/eaaDev/uiArchs.html)
  • Make the GUI code as simple as possible.
In the previous article I was looking at this specific problem to to with this view/controller for displaying the object managed by the application (boats, classes of boat, races, etc) but now I need to extend this to the rest of the UI. The other parts of the UI are mostly panels that display information about objects or are dialogs for modifying objects.

Initialization - Chickens and Eggs

One problem that came up with dialogs was that of composite views. In a traditional web MVC app the controller is invoked to display the view. The controller retrieves the data from a service as a model and then passes this to a view to edit. What happens if your view is actually a composite containing a sub-view and the sub-view is complex enough to have its own controller? Surely the view doesn't call the sub-view's controller to create the sub-view?

My solution was to have the view create the sub-view. The controller has to know about the internal structure of the view and so it creates a sub-controller to manage the sub-view. I can see scenarios where this will get sticky but it will do for now.

Presentation vs Logic

The next challenge is coming up with a consistent model for what is presentation and what is controller logic. The obvious thing to do here is anything that references SWT code is presentation but life is more complex than this...

Should the view update itself from the model directly or should it be updated by the controller? This article (The Humble Dialog http://www.objectmentor.com/resources/articles/TheHumbleDialogBox.pdf) argues that the view should be populated by the presenter and the view should be minimal. This generates a lot of getter/setter code as each field has to be exposed and then explicitly manipulated in the presenter. If this was done in the dialog it this would be much smaller.

I consider Combo boxes to be a good example of when this humble dialog model works well. Often you have a combo box with a list of possible selections and one either default value or (when editing an existing object) you have the current value. The code needs to populate the combo with the list of possibilities and mark one as selected. The code needs to handle the case where there are no possible values to select from, when there is no selection and therefore a default must be chosen and so on. There are a lot of things that need to be tested and if this code was placed in the GUI it would need to be done manually. Instead, exposing controls to add an item, mark the item as selected etc means this code can be done in the controller and tested. Is this view or controller code? I don't know but it works to move it.

Many dialogs (and other GUIs) will contain elements that are interlinked by the application logic. By this I mean controls that are affected by the value or selection state etc of other controls in the view. For example all the boats in a boat class (like Lasers) could start together or each division could start separately - if they start together then a control for choosing a single start time is active but otherwise a list of start times must be chosen.

Is this presentation code or business logic? It can be both as it may be logic that prevents an invalid choice being made but also this could be manifested in the GUI by a control being disabled so the user is aware of the restriction.

Its easy to implement in the GUI code but then you can't test it and sometimes the logic can be complex. Placing it in the controller does create some odd loops however as then the presentation notifies the controller of a selection and the controller must modify the GUI.

Compositing using Reusable bits

I have a couple of cases where the same bit of GUI appears in multiple views and as part of my move toward a more testable structure I wanted to make sure re-use of this kind was possible.

As an example I have a few places where a pair of combo boxes are displayed where one allows the user to choose the class of vessel and the second allows the user to choose which division of that class. So if you choose Laser you can then choose a division of 4.7, Radial and Full Rig.

There is logic involved in populating the combos that I'd like to re-use.

Using the Humble Dialog pattern, the presentation code is hidden behind an interface to allow the controller to be tested. The way this works is that:
  • There is an interface for accessing the combo boxes.
  • There is a re-usable panel that implements this interface and renders the combos. The implementation delegates to a controller when the user makes a selection
  • There is a controller for the combos that changes their state via the interface when the selection state changes.
Then when you use this component (say in a dialog) you:
  • Create methods for accessing the common-component interface (the combo box pair panel interface) from within the interface wrapping the dialog .
  • The GUI component instantiates the re-usable component and provides access to it via the interface
  • The controller for the GUI instantiates the combo-box panel controller. When the dialog  is created it is passed the controller and it then retrieves the combo-panel controller from within that and passes it to the combo panel on construction.  

Models

Another consequence of the design approach here (and of Humble Dialog) is that now there is no direct interaction between the view and the model. Instead the view is populated by the controller (or presenter)
and the data in the view is scraped out by the presenter to populate the model.

I'm not sure how I feel a bit this. It seems too hard (generates too much code) but the benefits are clear for many cases (such as the combo example above).

Time will tell as I launch into the re-development.

Saturday 6 April 2013

ATTiny85-10PU

Arduino Uno

Ages ago I bought an Arduino as I had a project in mind involving monitoring of a solar inverter at a site that is infrequently visited during winter.. The plan was to read the inverter status using MODBUS over RS485, log the time of day and voltage/readings into a file on an SD card.

I made some progress but then ran out of time/interest. I will probably go back to it. The hard part is the MODBUS interface as I have to take all my kit to where the inverter is to work on it.

Project

Anyway my son came to me with a project to construct a container that can protect a wine glass dropped from a 4 story building. His plan was to use an accelerometer to find out when the object is falling and then activate a servo that deploys a parachute.

We don't want to drop an Arduino off a building so the tool of choice was an ATTiny. The ATTiny 85s are super cute 8 legged chips that contain a complete microcontroller and need no external parts to run!

The first problem is that the standard servo library doesn't work on this uC as the built in timers are different. There is an alternative version available from here http://www.cunningturtle.com/attiny4585-servo-library/

First things first, my son ran some simple examples on the Arduino, made LEDs blink, made servos sweep etc. Easy.

Now the ATTiny came in the post so we wanted to program one of these.

Programming an ATTiny

To begin with I just wanted to see blink work on the ATTiny but this proved harder than it looks.

First to program the ATTiny you use the Arduino as an In System Programmer (ISP). There are instructions for doing this here http://hlt.media.mit.edu/?p=1695 that work for the 1.0.4 Arduino IDEm and the Arduino Uno (which we have). The important points are:


  1. Connect the ATTiny as follows: Pin 8 (of chip) to VCC, Pin 4 Gnd, Pin 7 (SCK) to Arduino Pin 13, Pin 6 (MISO) to Arduino Pin 12 and Pin 5 (MOSI) to Arduino Pin 11, Pin 1 (RESET) to Arduino pin 10
  2. DON'T put the capacitor between Gnd and Reset on the Arduino yet!
  3. In the Arduino IDE, with everything setup normally for programming the Arduino (i.e. board is Arduino UNO) load the example called ArduinoISP. Load this into the Arduino.
  4. Unplug, put a capacitor between GND and RESET. Note the stripe must go to GND if you are using an electolytic capacitor.
Now you have to make the Arduino IDE know about an ATTiny. Go here and download the zip https://github.com/damellis/attiny/archive/master.zip Open the zip and copy the attiny folfrt into your Arduino IDE folder under the hardware folder. Restart the Arduino IDE.

Now go to the Tools->Board menu and you should see a bunch of ATTiny options. There is no 10MHz option which confused me to begin with. Choose 8MHz ATTiny 85 (you want to use the 8MHz clock speed to make the 8Bit servo library work).

Now choose tools->burn bootloader. This will set the fuse bits to make the chip run at 8MHz as well as some other settings. You will get a warning like:

avrdude: please define PAGEL and BS2 signals in the configuration file for part ATtiny85

but you can ignore this.

Now load the blink example sketch, change the led pin to 0 instead of 13 and upload this. Again you get the PAGEL etc warning and it is done. Connect a 330Ohm resiste and LED to pin 5 of the chip and it should blink!

Stuff that went wrong

It took a *lot* of stuffing around to get to this point. It took a while to twig about running the Arduino ISP sketch and THEN uploading to the ATTiny. Ditto the reset pin capacitor.

I got an error along the lines of 

avrdude: Yikes! Invalid device signature
               Double check connectiona and try again, or use -F to override this check

The fact that my ATTiny is a 10MHz one and not an 8 meant I kept wondering if this was the cause of the problem. I though that I should be able to run it at 8 by setting the fuses but it refused to work.

The invalid device signature problem was caused by me confusing the drawing that shows how to wire up the ATTiny. The picture was rotated compared with our setup and I accidentally had SCK and MOSI the wrong way round.

After this I was able to burn the bootloader. Then I tried to burn the sketch but this failed with a verification failure:

avrdude: please define PAGEL and BS2 signals in the configuration file for part ATtiny85
avrdude: verification error, first mismatch at byte 0x000         
                        0x47 != 0x00
avrdude: verification error; content mismatch

This turned out to be to do with power. I read that noise can cause problems and that putting a cap across the supply lines can fix this but for me it didn't. The problem was that the power lines on the Arduino are in between the legs of the reset capacitor and we had it plugged into 3.3v instead of 5v. Once I corrected this the sketch burned Ok and I could run blink.

Thursday 28 February 2013

@XmlSeeAlso

This is quite simple but very handy.

I am working with an XML structure that doesn't lend itself particularly well to being implemented in JAXB. The XML has a common outer element but the content varies by message type. There is no XSD for the XML but a reference document that (roughly) describes the schema.

I modeled this as

@XmlRootElement(name="apimessage")
class Message
{
...
    @XmlAnyElement(lax=true)
    public MessageBody getBody()
   ...
}

interface MessageBody
{
}

Then I have sub-classes of MessageBody like this:

@XmlRootElement(name="bodya")
class BodyA implements MessageBody
{
}

I hit the first problem while testing which was that when decoding a message the decoder knew nothing about the body so you end up with errors like 


java.lang.ClassCastException: com.sun.org.apache.xerces.internal.dom.ElementNSImpl cannot be cast to com.xxx.MessageBody

I got around this by passing the sub-class types as parameters to the JAXBContext when I was initializing it.

Now this wasn't the end of my problems as these messages get passed over a web interface.. The error in that case was:

[com.sun.istack.SAXException2: class com.xxx.BodyA nor any of its super class is known to this context.

The solution is actually quite simple (although not very extensible) and that is you use the @XmlSeeAlso attribute to tell JAXB to register the sub-classes of MessageBody when the Message class is registered:


@XmlRootElement(name="apimessage")
@XmlSeeAlso({BodyA.class,BodyB.class})

class Message
{
...

And then it just works...

Thursday 21 February 2013

Spring Fakes

Ok this isn't rocket science but as it stumped me for a little while I thought I would share.

Essentially what I am trying to do is to replace a real interface with a fake so I can integrate the parts of my application without having the real implementation of the interface.

Specifically I am implementing a protocol for registering certificates but I don't have the implementation of the configuration yet. The interface is there but the implementation is ropey at best and the GUI for putting the configuration in the DB is a while off.

So I created a fake that hard-codes a configuration. The trick is how to wire this in without removing the real implementation jar (as the interface lives in there).

In Spring the XML configuration trumps the annotations. Most of the application uses the @Component and @Autowired annotations to tie it all together. I figured if I declared a bean in the XML it would override the real one.

Well yes but no. For some cases it seemed to work (that is some cases didn't throw errors) but in other cases it did. The trick it turns out is that even though auto-wiring is configured to be type based, the replacement is name based.

Basically to get it to work I had to make sure that the name of the config interface instance was always consistent and matched the bean ID in the XML. Then Spring would happily use the specified instance instead of getting confused over having multiple implementations.

Thursday 3 January 2013

MVC Basics

Sailing Club Results

Introduction

A long time ago I wrote a Java application for managing the results for my sailing club (dinghy sailing). It's harder than it looks as they have a handicap system and then the way they aggregate the results to produce an overall winner isn't straight forward either. Unfortunately they changed the rules a couple of years ago which blew my software to hell so I have been using spreadsheets. It is presently summer and so I'm on holidays and I thought I would do some work on my old application to see if I could bring it back. I learned a few things along the way and hence my post.

What Changed

With the numbers at the club dwindling, a couple of years ago they decided to implement an 'Open' class where boats that otherwise would have nobody (or few people) to compete with compete against boats of a different class using rating system. So essentially you can have a 420 competing against a moth and a 12 foot skiff even though they didn't sail the same course and clearly are boats with very different characteristics.

Instead of just having the small fleets in this open fleet, the idea is everybody goes in it. The classes that have sufficient numbers also are in a competition of their own so their results effectively contribute to multiple competitions. My club (as well as many others) have a general series where your handicap results are counted towards an overall result but also have a 'championship' series which is based on one race a month and instead the scratch results count towards the overall result.

This makes life really complicated as your result could then contribute to

  • The point score competition for your class 
  • The championship competition for your class 
  • If you are part of a division (like Radial Lasers which are a division of Lasers) then your championship result could also count towards the division competition. 
  • The fleet point score competition
  • The fleet championship competition 
So effectively your result could be counted towards 5 different competition and treated (handicap and rating wise) in 3 different ways! You can see how this got hard!

Application

The application is a Java GUI based on the SWT GUI toolkit that underlies Eclipse.

The data is stored in a HSQL database and I used hibernate and JPA annotations to retrieve the models.

The GUI is best described as an explorer style application with a tree on the left and a panel on the right that changes depending on what you select. The tree has nodes for registered boats and then lists each boat (under its boat class and division) below that. The races are grouped by date (so all races on a single day are a tree node) and then there is a leaf node for each race.

Problem

Well the initial problem was the data model needed a major re-think. I had each race contributing to one or more competitions. A fleet model described a set of boat classes that competed in a race and the results were then counted in each competition.

The new scheme is more complicated as one set of results could contribute to multiple races AND each race could count towards multiple competitions.

I began re-working the data model and discovered the implications were so far reaching I needed to effectively start with a clean slate and re-add the code back in as I went. This is when I started looking at the code again with a more critical eye.

GUI

The GUI was (at best) knocked together. I was learning Java, learning SWT and trying to make it work MVC style. The latter failed and I found myself reverting to my MFC ways and implementing lots of business logic in the GUIs. This consequently made the whole thing impossible to unit-test and so I was testing it manually. Consequently the app was fragile.

My plan is to re-write it to make greater use of Model-View classes and to separate the controller aspects of the GUI from the view.

RaceInfoTree

The RaceInfoTree is effectively already a MVC but some of the roles have gotten a bid muddled. The RaceInfoTree displays and manages the display of the race data as a tree of nodes.

At the heart of this is a RaceInfoTreeNode class which is then sub-classed by each node. The RaceInfoTreeNode is effectively a View-Model that provides the information required by the tree GUI component to render each tree node.

public abstract class RaceInfoTreeNode
{
    private RaceInfoTreeNode parent;
    protected List<RaceInfoTreeNode> children;

    public RaceInfoTreeNode(RaceInfoTreeNode    parent)
    {
        this.parent = parent;
        children = new ArrayList<RaceInfoTreeNode>();

        if (parent != null)
        {
            parent.addChild(this);
        }
    }

    public RaceInfoTreeNode getParent()
    {
        return parent;
    }

    public List<RaceInfoTreeNode> getChildren()
    {
        return children;
    }

    public void addChild(RaceInfoTreeNode node)
    {
        children.add(node);
    }

    public void removeChild(RaceInfoTreeNode node)
    {
        children.remove(node);
    }

    public boolean hasChildren()
    {
        return children.size() != 0;
    }

    public abstract String getLabel();
}

Then there are sub-classes for each node type that holds a pointer to a model class held by that node. For example there is a BoatClassNode that holds a BoatClassModel which hold information about a class of sailing boat (such as Laser or 420, Flying-11 etc).

Originally each node had a method for customizing the menu for that node with actions that could be performed. The trouble with this is it drags a SWT dependency through all this code and is really a controller issue. I removed this and created a controller that did this by switching on the node class.

There is a RaceInfoTreeBuilder that builds the node tree from the DB initially. Originally this took an EntityManager and used the DAO classes to extract the data. I moved all the DAO code into a series of service classes and now the EntityManger is located by the service. The service is fronted with an interface so now I can test this stuff without a DB.

The RaceInfoTreeBuilder got a bit overgrown with methods for adding nodes to the tree. For example if you add a race via the GUI the builder would get called to locate the appropriate node and add the race node. This all got moved to a RaceInfoTreeController as it makes sense in that context.

The RaceInfoTree which is the class that extends TreeViewer and hooks this together with a sub-class of the ContentProvider and LabelProvider also started to grow a few warts. When an action was performed I needed to know what had been selected. This then grew into code for casting this to the right node sub-class and then code for adding new nodes in the right place. This all belongs in the controller so that's where it is all going.

Next

There is still much more to do - updating the dialogs to use View-Models, getting the right-hand side view panels working again with the new tree and so on. Plus I plan to add lots more unit-testing along the way.

Unfortunately my holidays are running out...